Getting Started
disclaimer: This is a bit out of date.Don't buy iron, new players use bronze
Reputation
The most valuable thing you have in Movoda is your
REPUTATION. Reputation is how the players, mods and Mskwik (Admin) view you and how you play. Of course there are many playing styles, and many different views. But if you are chatting and being an all around annoyance, it will stick with you. Don't go out of your way to get into trouble with the Mods. If you are starting to get warned, stop and take a step back. Look at it before you say anything else. A player's reputation makes him/her a good or bad player, not any one skill. Movoda's chat is moderated 24 hours a day every day, there is no exception. Also, please review the rules of this game and enjoy.
http://movoda.net/man/Rules
Now then, lets get into the game. This is a brief overview of how to do basic game mechanics.
Basic Interface
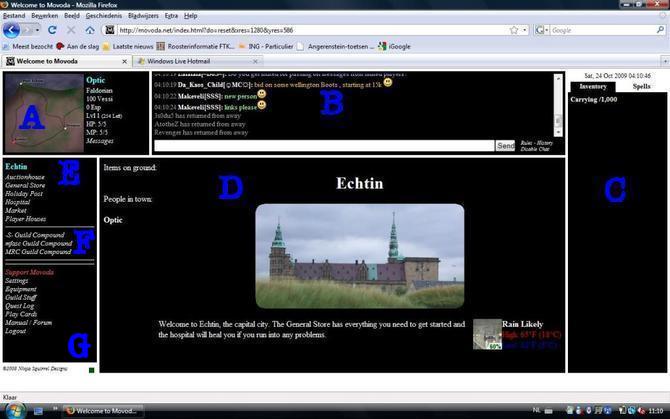
A) Map
Moving is quite easy, just point and click. For example, if you are currently in Echtin, and if you would like to move to Droesar just click on the “Droesar” city dot.
B) Chatbox
World chat will show the players name in white, followed by text (may be colored text, see
Chat Commands to find out how to get colored text).
Guild chat will show the players name in green, followed by text.
Whisper chat (chat in the town you are in, only) will show the players name in purple, followed by text.
Yellow messages are System messages, forum posts, Invasion alerts, etc.
Orange messages are guild system messages, guild forum posts and guild announcements.
Red messages are alerts that someone has either sent you a message or cast a spell on you.
Blue messages are warnings and mutes from the system/mods.
C) Inventory
Items you are carrying, your carrying capacity is how much you can have in your inventory. If this gets too full, you can no longer work.
D) Action Screen
It shows if you are woodcutting, mining, smithing, cooking, etc. Under the “Items on ground” it will show a list of items that are currently on that city. You can pick up the items by clicking on each item. And under “People in town” it will list player names, you can click on the name to set up a pvp trade.
E) Town Name
It shows the town you are in and the options of things to do in that town. Click the town name to stop actions and return to the town screen at any time, you can also click the town name to activate Quests (if any are available).
F) Guild Compounds
Click on a guild name to see if a guild has a store, to see the artifacts they have, and if they are an ally you can help guard their compound in a raid. If you have joined one of the guilds that has a compound on that city, click on your guild's name to access your guild compound.
G) Basic Links
Support Movoda = A link to
http://movoda.net/man/Support_Movoda
Settings = Change password and other options.
Equipment = Equip/unequip item to use.
Guild stuff = Lists guilds that inviting you. If you have a guild already, it will show your guild page.
Quest Log = Lists quests you currently up to, and how to finish it.
Play Cards = Play cards with people in that town.
Manual / Forums = Access manual if you click 'Manual', and access forums where you can post various things.
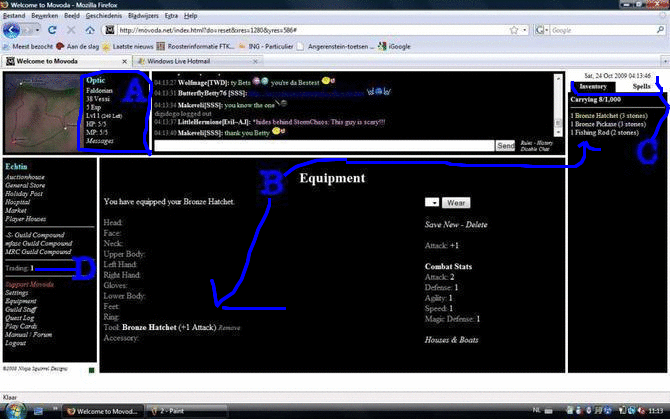
A) Basic Information
From top:
Screen Name. If there's any symbol or emote appears next to your name, that means a bot check is coming up. Click the symbol or emote to bring up a pre-bot check, and you will be able to continue working uninterrupted.
Nationality. The first nationality you get is Faldorian. You can change it later. If you want to know more about changing nationality, see
Quests page and then scroll down to Citizenship Quests part.
Vessi. Movodian currency.
Total Character Experience
Character Level with how much experience is needed for next level.
HP = Health Points
MP = Magic Points
Messages. This is your in-game mail service. You can send and receive messages to/from other players, and MODS (explained later). If you have any unread messages, it will display (<number> new) while <number> is the total unread messages.
B) Equipment Page
You can Equip items here. Open this part by clicking on Equipment lower left side. Once you open the Equip page, click on the item or items shown in C to equip them.
Equipping items is necessary to walk faster, complete skills, or gearing up for combat. So click on Equipment on the left hand side of the interface. You will then see a page with all your equipment slots (see screenshot). To equip a certain item click on the item in you inventory and then the item is equipped and you should see the change in the correct equipment slot. Items in yellow in the inventory are items already equipped.
Houses and Boats. Forget where your house or boat might be? Click on it and it will tell you.
C) Inventory & Spell Tabs
You will be able to learn Magic spells when you reach Player Level 10. Every thing you pick up and buy will be listed under inventory.
D) List of Skills
Shows the Level of each skill you have. Click on a skill to see your experience in that skill. Note: skills will not appear until you have at least 1 experience in that skill.
Botcheck

This is what a simple bot check looks like. These are common and you get them about every 15 mins. If you fail 3 bot check you will stop working and have to restart. If you do not click the bot check you will not continue working there until you do.
Where To Start
Well some people think you should grab a skill and start right away. HOLD UP. You need to figure out a few things before we do anything, but while we do that lets do the very first thing. Just so you know what you generally have to do. Let's have you buy a bronze hatchet at the general store. Why? Well, you will be cutting wood. Well, what if I don't wanna cut wood for one of my major skills? That's okay, let me show you the priorities, and a brief explanation. Now the priority DOESN'T have to be this way, but it is an easy way to get started. Just keep the priority in mind.
1. Find a
GUILD: Guild will help you in so many ways. Not only will they help you with questions you may have. “Normally” if you donate stuff to the guild you can get equipment and food a little easier with the guild. But it's give and take. DO NOT EXPECT the guild to just immediately give you everything for free, you have to earn it.
2. Figure out what two
SKILLS you wanna master: Why only two? Well if you do everything that would be awesome, but then you would be kind of mediocre in all the skills. Also, the guild may need you for a certain skill, if you are having trouble figuring out what you want to do. Some two skills have better combinations but it really doesn't matter.
3. Get a home: A home allows you to store 1,000 stones. But that take 100 Vessi, 500 lumber which takes 500 logs (don't need all the logs before building; you can add logs after started to build your house), which is why I am having you chop wood, which is also why you are buying a bronze hatchet.
Now you can do all these at the same time. Lets first get you moving to chopping wood, and while we do that you can figure out the rest. So we are currently at Echtin. Click on General Store.
NOTE I recommend you buy two hatchets. Items do have a chance of breaking when you use them.
So change the 1 to 2. Then click buy. Now you should have 2 bronze hatchets in your inventory. Now you should be down to 68 Vessi. That is ok, if you don't see them currently, you may need to refresh your screen. Hit F5.
Now that you have your hatchets, let's move to Rissdra. That is the first woodcutting area. This will be a little bit of a walk. Let me show you how to move to Rissdra. Look at your Minimap. Click on the road to the right. We want to move to Droesar > Moskim > Lake Essdar > Rissdra (Check
Beginner Map to see where we are going). You move yourself with the mini-map.
Once at Rissdra, click on
Equipment on the left hand side. Then in your inventory, on the right, click on
Bronze Hatchet. Then click on
Chop Wood on the left hand side. Chop 100 logs. Now while you are just sitting there waiting for the 100 logs. Explore the forums. Lets find out some information on guilds to help you make a decision on who to join. Go to Highscores, and click on Guild Ranked by Experience. Just look at the guilds. Now click on Guild Ranked by Members, once again just look and keep that in mind. Now of course I'm not saying join the high ranking guilds. It's just a piece of information you can use to make your decision. If you have an idea on who you would like to join based on chat, helpfulness of people and your decision making skills; let's see how to apply.
First way to get some information is on the guild ranking sites is click on the guild's name and it will take you to information regarding the guild and how to apply. Follow whatever instructions are provided. Second way is to look in the forums under Gameplay, click on Guilds. Will list what guild's are looking for what, but I recommend doing the first option. Not all guild's keep that up to date. After you have been sent an invite, click on
Guild Stuff, and accept the invite. Refer to
Interface. and section 5 on chat.
Accepting Guild Invite
Once you have chopped 100 logs we need to get you some money back. You have one of three options. You can sell 100 logs to a player for 300 vessi (or current market value), go to create rods with crafting skills (Rods sell for 10 Vessi at Echtin ), or you can sell logs at Rissdra for 1 vessi per log (with level 2 Woodcutting). I recommend doing the second option. Gets you moving and gets you training another skill, and you get more for your resources.
So with that said, move back to Echtin. Purchase 2 Pocketknives. Then move to Port Schow. Once at Port Schow, click on
Equipment, and click on Pocketknives in your inventory. Start creating fishing rods until all 100 logs are used. Now move to Echtin.
Once at Echtin, click on
General Store. You don't see an option immediately to sell those rods. Click on
Fishing Rod in your inventory. Now you should see an option to sell. Sell all but 5 if you plan on leveling the Fishing skill. Now you should have at least 100 vessi to clear for your house.
Now head back to Rissdra. Cut 500 logs or as much as you can. Then once your carrying capacity is full. Head to Galawi. Click on
Use Sawmill. Turn your logs into lumber. Now that you have some lumber. Let's pick you site for your house (don't need all the logs before building; you can add logs after started to build your house).
Your house you generally want in an area where you would be working on your skills alot. But keep in mind once your skill is higher you will be going to the continent to increase your skills. Here is a list of places to build >
Construction.
Emotes
http://movoda.net/man/ChatCommands
If you wish to donate, please do so at
Donations. If you enjoy the game please donate. Even donate over time. The donations are cumulative. The donations help mskwik with server fees, etc.
Another Way To Make Vessi
There is always fast ways to make money. But the easiest way to make
Vessi when you first begin is through a few steps. Being in a guild will make this faster but if you choose to hold off for a few days first, then follow these steps to get the most for your resources. But before that, decide on what skill you will consider to level up the most since this is a good way to start your leveling, too.
Suggested way 1:
Skills that will be leveled up: Woodcutting, Fishing, Cooking.
1. Buy a Fishing Rod, Bronze Hatchet, and a Tinderbox at Echtin's General Store.
2. Go to Ponat Pier and fish 100 Mackerel.
3. Go to Rissdra and cut 200 logs.
4. Go to Lake Essdar and cook the Mackerel to get cooking level 2, sell some cooked or uncooked mackerel
5. Rinse and Repeat as much as you would like.
Suggested way 2:
Skills that will be leveled up: Woodcutting, Crafting.
1. Buy a Pocketknife and a Bronze Hatchet at Echtin's General Store.
2. Go to Rissdra and cut 200 logs.
3. Go to Port Schow and make Fishing Rods.
4. Go to Lake Essdar and sell the Fishing Rods for 12 Vessi each.
5. Rinse and Repeat as much as you would like.
NOTE You need Cooking level 2 to sell the Fishing Rods at Lake Essdar.
Suggested way 3:
Skills that will be leveled up: Woodcutting, Mining, Smithing.
1. Buy a Bronze Hatchet, a Bronze Hammer, and a Bronze Pickaxe at Echtin's General Store.
2. Go to Droesar and mine 100 tin ores.
3. Next, mine 100 copper ores.
4. Go to Rissdra and cut 100 logs.
5. Go to Ponat and smelt bronze bars.
6. Smith Bronze Hatchets or Bronze Pickaxes.
7. Sell the Bronze Hatchets at the Rissdra's Wood Shop or sell both hatchets and pickaxes at Echtin's General Store.
8. Rinse and Repeat as much as you would like.
NOTE You need Woodcutting level 2 to sell the Bronze Hatchets at Rissdra.
Suggested way 4:
1. Gather as many resources as you can hold (logs, copper ore, tin ore, mackerels, etc) and sell them to the highest bidder. Either on forums or just message general chat ONCE with what you are selling.
Trading
Trading allows you to transfer items and Vessi from one person to another person. Once in town (any town) click on the persons name you wish to trade with under the heading people in town (if you don't see the person hit F5 to refresh).
Now you can add anything from your inventory by clicking on any item within your inventory and adding how much of that item you wish to trade. You can also click on change underneath the trade box and add Vessi to the trade. Make sure you both have enough stones to carry everything. Now just click on Accept and the trade is finished.
Hint (Use the refresh button if the trade seems to be taking longer then you expect).
Guild Overview
A Guild is a group of people working together to help each other. Now a guild has some needs from you as a guild member and you have some demands from the guild. First you need to decide what you want from your guild. Maybe your needs require food or gear to do combat; but you would have to think of what the guild would need. In that example they would want you to protect them and level your combat skill. Maybe you just wanna cut wood. Well you would require hatchets and tools to lower your woodcutting time. Whatever you need figure it out. Whatever you want figure it out. You also need to figure out what your are willing to do and not do for your guild. Are you willing to donate all the resources/items involved with your skill to the guild? Are you willing to donate any? What are you willing to give to your guild for what they do for you? Your guild is a partnership. It's give, give. If you are not willing to give back to the guild. Maybe a guild that doesn't supply you with anything is the guild you are looking to join.
Now before you join a guild, let me say a few things. Don't guild hop. What I mean is jumping from guild to guild. It doesn't look good. It will actually make your reputation with other guilds very low because you aren't dependable. Guilds want dependable people. Now with that said if you have a problem in a guild, work it out. Everyone has different views, different styles. Sometimes guilds change policies to adjust to the growing concerns of the guild. Learn to adjust with your guild, things change all the time and the guild may change with it. Be flexible.
Now that you have an idea of what you would like from your guild, let's help you find the one you wish to join. Now I'm am not recruiting or advising you what to look for but will tell where to find some general information. Some things you may want to check for is how they are organized, (Ranks, etc.) and what policies/rules that the guild may have and make sure you can follow those rules. Some places to find out some information about guilds. If you click on
Highscores you will see two links for guilds. Guilds Ranked per Experience is where you can see the top 20 guilds with the most guild experience. Guilds Ranked per Members is where you can see the top 20 guilds for how many members they have within their guild. Now you don't necessary just wanna go off the rankings although its good information. Now you can also get some great information in the Forums regarding the guilds. Click on Forums and go to General > Guilds. Most guilds post what/who they are looking for and how to apply. Now if a guild is not there, go to
PageIndex and find the guild you wish more information.
Now once you have been invited to the guild you need to accept your invitation. Click on Guild Stuff, and then click Accept for the guild you wish to join.
So you are in a guild, now what? Well first to speak in guild chat, type what you wanna say and hit
SHIFT+ENTER. If you forget shift you will still type it in guild chat. Careful what you say. Now you may also may want to invert your chat so that when you just hit
ENTER it defaults to guild chat instead of general chat. You do that by typing
/chat invert.
How To Find Items Prices
This is just a post to better assist players in finding the “prices” of items. Mostly to help new players find the value of an item and those who do not sell/trade often.
I have noticed that some players are asking for a PC (Price Check) of some fairly common items which were recently given a price check. Instead of waiting for a reply, which may take days, you can find the price(s) of item(s) yourself. All you have to do is use «CTRL + F».
*Depending on your browser/version, you may have a “pop up” or a “toolbar” will come up and asks you to what you want to 'Find'. Just type in what you want to find. It may also tell you the number of “matches found”.*
eg. If I wanted to know the price of an “apple” – I would click on “Forum” > “Food” and then use «CTRL + F” and type in “apple”.
It will find the last “apple” that was auctioned off. If you click “Next” it will find the “apple” auction that ended just before that. Just divide final auction price / quantity to get price per item. I suppose you can use a few auctions to get a “range” of the average price for an item because prices are not always the same (+/- a few vessi).
If I wanted to find the price of an “oboe” I would go to “equipment” instead. It would be the same process as searching for the price(s) of an apple.
The auctions goes back about 1 month. You should be able to find plenty of items that were listed/sold over the past month.
However, should you be unfortunate enough to not be able to find anything because no one has sold a certain item (eg. bloody staff), I would suggest posting a PC post then.
Locations For Levelling Up Skills
*
Port Schow – Crafting
*
Echtin – General Store
*
Droesar – Mining
*
Moskim – Combat
*
Lake Essdar – Cooking
*
Galawi – Construction
*
Rissdra – Woodcutting
*
Ponat – Smithing
*
Ponat Pier – Fishing
How To Edit Your Own Page
Manual
The manual (which you are reading now) is a wiki. A wiki is like a website which anyone can edit. You can add, remove, and edit pages. First, lets start with making your own page in the manual.
Your Page
Every player is allowed to have their own page about themselves in the wiki. This page is like your own personal webpage. You can put anything on your page as long as it follows the rules. To create your page, first click on high scores on the left menu (you can open it in a new window, so that you can keep this guide open). Then, scroll down until you find your name. It should be underlined with a ? next to it. Click on the question mark, and you will be taken to a screen where you can edit your page. If there is no ? next to your name on the high scores table, then your page has already been created, and you can just click on your page, and click the
Edit this page link on the left.
If you are not on the high scores, just go to the following URL:
http://movoda.net/man/(Your Name)
Adding Text
Now its time to add some text to your page! Type anything you want into the large white box, and click the
Preview button. You can then see a preview of what your page will look like. You can still edit the page if you scroll down. When you are satisfied, press the
Save button, and your page will be created (or updated, if it was already created)!
Formatting Text
Just plain text can be very boring, especially when you have written a lot. You can see that this page has used various formatting, such as
underlined,
italicized,
bold, and headers. To start with, you can make a header for your page. To make a header, just use the following code:
Add that to the top of your page (and replace
(Your Name) with your actual screen-name, of course), and click preview. You will see a header at the top of your page You can also create smaller headers with additional = signs. Like this:
All the way up to six
Here is a list of some other common formatting tags. For a full list, check out the
 WackoWiki Documentation:
Bold:
Italics:
Underline:
WackoWiki Documentation:
Bold:
Italics:
Underline:
Link to another page:
(Everything after the first space is the text that is shown)
Link to a page on another website:
(Everything after the first space is the text that is shown)
You can edit almost any page in the manual in this way. If you are ever curious as to how someone did something, you can just click the
Edit this page link and look at the code.
Restoring Pages
Now, since the manual is open for editing, it is quite possible that someone will tamper with your page by erasing information, putting bad things, or just changing things that you don't want changed. Luckily, it is easy to restore pages to how they were previously. Just follow these steps to restore any page:
1. Navigate your browser window to the page you wish to restore.
2. Up where it tells you the current URL of your current page, add «/revisions» to the end of it (excluding the quotation marks)
3. Click on the second date on the list.
4. Make sure that everything on the page looks correct. If it does not, hit back on your browser, and try the next date on the list.
5. Repeat step 4 until you find a page which is correct.
6. Scroll all the way to the bottom, and click the button that says “Re-edit this old revision”.
7. Scroll to the bottom again, and click the button that says “Save”.
The page should now be restored as it was before. This will work for any page in the manual. If you see a page that has been tampered with, please restore it. It is greatly appreciated by everyone!
FAQ
Here are some of the most Frequently asked questions that the admin, guild leaders and Veteran players receive regarding Movoda.
How do i change my password?
Under section B Click on settings to change password,E-mail and many more options there.
How do i get back to the main center screen with players names?
Click on the town name Left side Right under the lil map in a lite blue look.
Can i leave this island?
Sure you may leave the main land once you hit lvl 10 character.
Can i fight and kill monsters?
Not the best idea untill lvl 10 character and have a good speed level.
How come I can't use the wharf?
Reach character level 10.
How do I start using the magic skill?
Get to character level 10 (for the wharf). Get an
Emerald. Go to
. Click on the city name in blue and begin the quest.
How do I use my house?
Go to the city where the house is located. Click on Player Houses. Click on
New House. Click on an item in your inventory. Choose how much you wish to
add to your home or click move all. Your items are in your home. Do the reverse
to take anything out of your home.
How do i use the guild compound?
Go to the guild compound. Use it like a house.
How come I can't build my house in any town/city?
Simple answer is because you can't, move to city you can and build it. But a
great answer is houses can only be built in locations classified as a
Town / City?. For example, Droesar is a large excavation site. And on Beromi island
it was an invasion and we had to build the cities and only certain locations were
we able to create aquaducts. Good answer provided by Hawkeyep. Thanks.
How do I make all of those smilies?
how to make them. It will also show you how to use the chat commands and
how to change your text color if you have donated.
What are cards for ?
Cards is a skill you train when you play
Cards against another player.
Well this tutorial is over. It should get you started. Have fun.
And remember: REPUTATION, REPUTATION, REPUTATION.
Special Thanks
thatgirl – Providing hamsters to edit this page a little bit.
Discordia – Created the second getting started page.
FallenKnight – Provided images and alot of feedback and direction.
slomo – Provided images
Stargazer – There when needed
JoveS – For doing alot of stupid small things for me.
Moc1 – Emote, for your guidance. You started me on this and I think I over did it?
KnightofDoom – Emote, and for stealing items from the compound. hehe
Rev – I was using your page for the wiki examples.
eddy999999 – Creating the Manual portion of the Getting Started page.
Bull – for the old beginner map. Thanks.
Hawkeyep – Creating the first getting started page. Will add your name if I know who may have also helped.